Aerial drone photography has skyrocketed in popularity over the past short years. Until recently it was only possible to photograph aerial images from a manned aircraft. With the emergence of both more affordable consumer and new highly technological enterprise aerial drones, we now have the complete wherewithal to soar up into the skies and capture our own bird’s eye view.
Despite new opportunities to buy and fly an aerial drone – with strict adherence to drone regulations, naturally – simply taking off into the wide blue yonder and clicking away will not render breathtaking aerial imagery.
Like “anything-photography,” there are skillful aerial drone techniques that you can develop and call upon when capturing stills and moving pictures from the sky. As you improve upon your drone photography talents, these 9 aerial drone photography tips and tricks will help you capture better imagery – taking your aerial drone photography to a “higher” level.
1. Shoot in RAW Format
Raw files manifest far greater flexibility should you plan to post-process your images. Capturing aerial images in RAW format provides the following enhanced benefits:
- Greater post-editing control
- Non-destructive editing
- White balance flexibility
- Better lighting control
- Large print image capability
- More dynamic range
2. Research Drone Flight Mission Location
Part of the thrill and adventure of aerial drone photography is seizing visual perspectives that cannot be taken in or captured from ground elevations. Not only for safety purposes must the aerial drone pilot in command be situationally aware of the entire selected drone flight area prior to clear take off, the remote pilot in command should plan out every detail to ensure better results when setting out to snap the best composition of the main target subject.
The goal is to minimize the risk for failure while increasing your opportunity for photographic success.
3. Factoring Time of Day
Just as it is with any other form of photography, lighting consideration are critical in aerial drone photography, too. Direct midday sunlight can generate problems like distracting reflections or picking up the glowing hot sun in the shot. The softer atmospheric light of the morning hours or evening periods will commonly be the most optimal times for best-in-class aerial drone photography.
The epic shadows observed in these most favorable conditions afford the difference between “flat” and “WOW!”
4. Apply Rule of Thirds

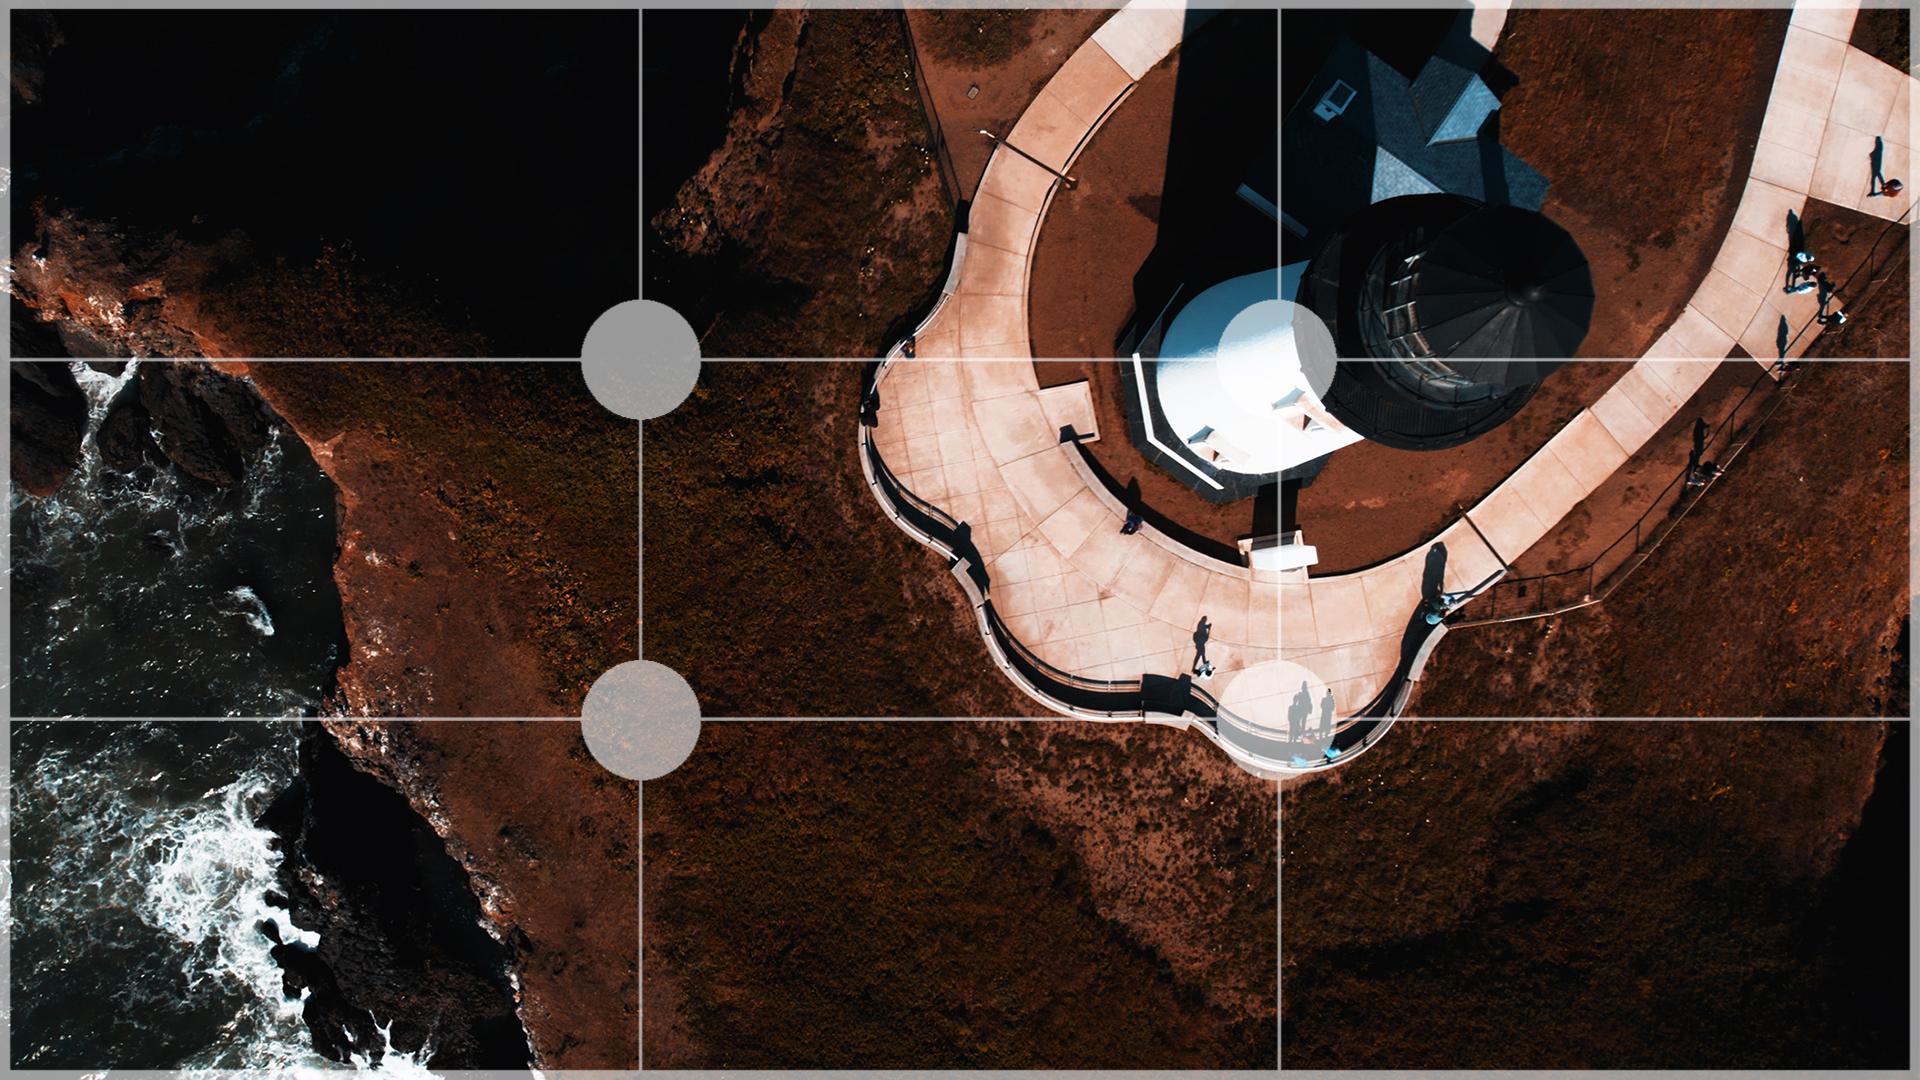
Example: The Rule of Thirds
A common compositional guide, the “Rule of Thirds” divides your framed image into an equal – three-by-three grid – with two vertical lines and two horizontal lines which intersect at four points.
The Rule of Thirds helps the aerial drone photographer place a given subject on the left-third or right-third of the frame, thus creating a more eye-pleasing composition.
Certain aerial drone makes and models have a function to enable a 3×3 grid overlay that can be accessed and controlled inside the drone’s flight application settings.
For example, should your image include the horizon, position the grid so that the sky rests in the top third of the frame with the landscape taking up the bottom two-thirds of your composition.
5. Aerial Drone Photography Composition
To compose and capture that exquisite aerial drone photograph, look for those leading lines, experiment at various altitudes, watch for notable patterns, and seek symmetry to acquire a sense of harmony and beautiful proportion and balance.
Your leading lines will draw the viewer’s eye into and through your entire image while conjuring up enhanced visual interest and scene depth. Experimenting at various altitudes will provide the aerial drone photographer with a far greater variety of interesting angles and awe-inspiring visual perspectives.
To add greater interest to your aerial drone photography objective, scan for symmetry and flowing patterns in the landscape. For an even more dramatic effect, be sure to capture plenty of images from top-down.
6. Maintain Low ISO
Amazing aerial drone photography is about capturing the best aerial images possible. Noise and grain can take an otherwise stellar image and send it packing straight to the trash drive to never be heard from again!
You may well need to adjust your shutter or aperture (should your drone have this capability) to nail the correct exposure, but be sure to manually set your ISO to 100 (or as close as you can).
Ensuring that you hold close to ISO 100 will result in noticeably crisp, cleaner, and tack-sharp aerial drone photographs.
7. Stacking Images
Increased image detail and reduced random noise patterns are the most notable benefits for employing the “stacking” process. In a nutshell, when a set of images is stacked, the individual image values are averaged. Thus, the random noise overall recedes while the signal remains constant.
Set the ISO to 100 and shoot at 5 to 7 frames in burst mode (depending upon your drone make and model). These multiple images can be stacked in photo editing software such as Adobe Photoshop.
The rendered stacked image will be noticeably cleaner and will also accommodate larger prints.
8. Use Auto Exposure Bracketing (AEB)
When it comes to increasing the dynamic range of your aerial drone photography, auto-bracketing your images has become a significant tool to call upon.
For example, you’re shooting a high-contrast scene, like a sunset, and you determine that a single exposure cannot capture the entire spectrum of light from the shadows through to the highlights. Enable Auto Exposure Bracketing (AEB) and three to five images will be captured at various exposure settings.
Similar to the image stacking process, the separate exposures can be easily merged in photo editing software like Adobe Photoshop or Lightroom to produce your final photograph with a high dynamic range (HDR).
9. Consider Drone Camera Lens Filtration
Invest in a quality set of Polarizing and Neutral Density (ND) and filters, such as those produced by Freewell or PolarPro, to control how the light reaches your aerial drone’s camera sensor.
Neutral Density (ND) filters give you enhanced control over your images and, in the right environment, allow for long exposure photography to amazing effect.
Circular Polarizers reduce the glare from reflective surfaces such as water and glass, saturate colors, and increase the contrast of an aerial composition – adding pop and vibrancy to your image.
The Takeway
Next time you take to the skies to capture that unique aerial vantage point, we hope these aerial drone photography tips will help you capture a most remarkable creative adventure.
Happy safe flying and you probably won’t want to forget to charge and pack those spare batteries before you leave the house! T 🙂
Written by: Tony Marino, MBA – FAA Certified Part 107 Commercial Drone Pilot and Chief Business Strategist at Aerial Northwest


Leave a Reply
Your email is always safe with us.