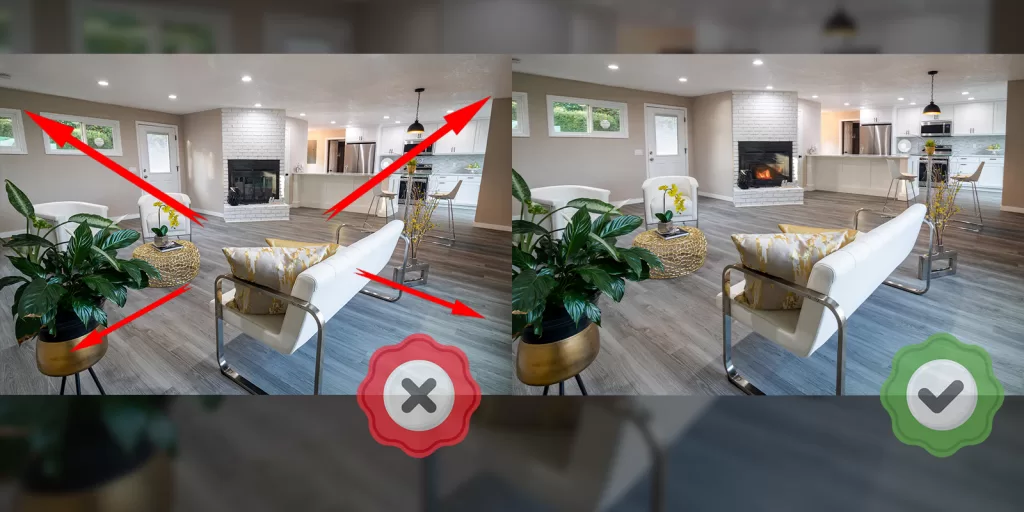
Real estate photography demands precision, and the challenge often lies in dealing with what we’ll call the “distortion bulge.” When we use wider-angle lenses, which are prevalent in this field, it can lead to a peculiar effect where straight lines appear anything but straight and parallel lines no longer seem parallel.
In this article, we will delve into the intricacies of two main types of distortion: Barrel/Pincushion distortion, which we’ll now refer to as “bulging distortion,” and perspective distortion. We will explore methods to conquer these distortions, ensuring that your real estate photos are impeccable and free from the pesky “distortion bulge.”
Understanding the “Distortion Bulge”
Bulging Distortion (formerly Barrel/Pincushion Distortion)
The term “bulging distortion” aptly describes what happens. It’s as if your image takes on the shape of a bulging barrel or as though a pin has been pushed right into the heart of the photo, causing parts of the image to warp through this imaginary hole. For instance, if you have a door frame in the center of your image, it may curve inwards or outwards, akin to a fish-eye lens effect. Our eyes and brains naturally correct for this distortion, but in the realm of photography, it’s our responsibility to address it.
Perspective Distortion
Perspective distortion occurs when the angle of a straight edge shifts concerning all the points along that line. This distortion becomes more pronounced when using wider lenses. Unless you’re running a fun-house mirror exhibition, it’s essential to rectify this distortion in your real estate photographs.
Tackling the “Distortion Bulge”
Bulging Distortion
Addressing bulging distortion in-camera can be quite a task, as most lenses exhibit some level of this distortion. One solution is investing in a high-quality lens that boasts advanced distortion correction features. Another option is to utilize software such as Lightroom, which maintains a database of lens and camera profiles and can automatically correct this “distortion bulge.” If your camera comes with software, it likely includes an automatic correction feature for this type of distortion.
Perspective Distortion
Correcting perspective distortion starts with proper camera positioning. Make sure your camera is level both side-to-side and back-to-front. Achieving this can be easier with the help of a tripod, which provides stability and often includes leveling aides. Some tripods have a “bubble” level, indicating when your camera is perfectly level.
For those without these features, manual correction is possible by adjusting your camera’s position, tilting it up or down while framing your shot. However, it’s crucial to understand that some degree of perspective distortion will likely remain, regardless of your efforts.
Post-Processing Correction
In post-processing, you can further refine your real estate photos to correct perspective distortion or the “distortion bulge.” Software like Lightroom remains a valuable tool for this task. Lightroom can automatically detect and correct this distortion, and its automatic correction features continue to improve with updates, delivering more refined results.
If, even after using Lightroom, you notice some remaining “distortion bulge,” manual adjustments can be made to fine-tune the correction.
Demonstrating the Solution
We understand that mastering the art of overcoming the “distortion bulge” may seem complex. However, we have an exciting solution for you. You can watch a brief, informative video demonstration that will walk you through the process of correcting these distortions in minutes. This not only saves you valuable time but also helps you avoid unnecessary expenses. By implementing these techniques, you can create exquisite renderings that will impress your valued real estate clients.
Conclusion: The Takeaway
In the highly competitive and ever-expanding world of real estate photography, ensuring your images are free from the “distortion bulge” is essential to leave a lasting impression on potential buyers and clients. Understanding and correcting both bulging distortion and perspective distortion is a crucial part of this process. Whether you invest in high-quality lenses or use post-processing software like Lightroom, taking steps to overcome the “distortion bulge” will elevate your real estate photography to a professional level.
Be smart, safe, and forever fly!
If you have any questions, let us know! If you’d like to hire us, you can get more information here.
Written by: Tony Marino, MBA – FAA Certified Part 107 Commercial Drone Pilot and Chief Business Strategist at Aerial Northwest
Disclaimer: The information provided in this blog post is for general informational purposes only and should not be construed as legal advice.

DRONE BUSINESS STRATEGY MAGAZINE
A free digital publication made exclusively for all small business drone pilots to them help start-up, become profitable while sustaining a competitive advantage within the drone service industry sector they opt to serve.
“If you love to fly, we’d love to have you come aboard!”
We share your information with no one. Our Privacy Policy.


1 Comment
Leave your reply.